Buy Verified Cash App Account – Complete Guide
Email: contact.smmproit@gmail.com
Telegram: @smmproit
Whatsapp:+1(812)528-8960
https://smmproit.com/product/buy-verified-cash-app-accounts/
If you're running a gaming business or dealing with fast-paced financial transactions, you already know one thing: time is money. That’s where a verified cash app account comes into play. Instead of dealing with limits and delays, verified cash app accounts give you smooth access, higher transaction limits, and uninterrupted services.
Let’s dive deep and explore everything step by step
## Why should you buy Verified Cash App accounts for your gaming business?
Running a game host platform or handling in-game payments? You need speed, trust, and flexibility.
### Gaming Payments Made Easy
With verified cash app accounts, your financial transactions become instant. No delays, no confusion. Players can send money quickly, and you can receive it without limits.
### Faster Transactions for Players
Gamers hate waiting. A verified account ensures smooth transactions so players stay engaged. Think of it like live streaming vs buffering — one keeps people hooked, the other loses them.
## The positive side of Buy Verified Cash App Accounts
### Security & Trust
A verified account builds trust. Since it’s linked with a government-issued id and phone number, users feel safe sending money.
### Higher Limits
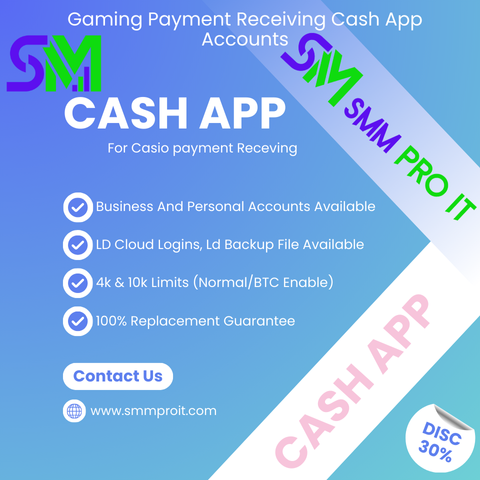
Unlike unverified accounts, verified ones offer:
Higher transaction limits
Unlimited uploads share infinite
Better access to premium services
## How to unlock Cash App Borrow?
Want to access borrowing features? Here’s how:
### Step-by-Step Process
Use a verified cash app account
Maintain regular transactions
Link your bank account
Keep account activity active over time
Consistency is key here. The more you use it, the more features unlock.
## Benefits of Owning Buy Verified Cash App Accounts for gaming business
### Business Growth
More transactions = more money. Simple math.
You can:
Accept payments faster
Run multiple profiles
Manage creators upload easily
### Multiple Profiles Advantage
Running different games? Use multiple profiles to manage them efficiently. It’s like having multiple shops under one roof.
## How to Buy Verified Cash App Accounts from smmproit
Buying from smmproit is simple and smooth.
### Step-by-Step Buying Guide
Visit platform
Choose verified account
Complete payment
Get account upload instantly
Access via free login
You’ll also get 24 hours reply contact support.
## Why Do People Trust smmproit
### Customer Support
They provide quick help via telegram and support channels.
### Quality Services
Verified accounts only
Safe transactions
Reliable delivery
That’s why people keep coming back.
## When Buy Verified Cash App Accounts?
### Best Time to Purchase
When scaling your gaming business
When transaction limits block growth
When you need uninterrupted listening upfront tracklists (continuous service flow)
## Buy verified cash app accounts
This keyword is trending for a reason. Businesses want:
Fast payments
Reliable services
Unlimited uploads share infinite
## Buy a verified cash app account
Buying one saves time. Instead of going through long verification, you get instant access.
## Buy cash app verified account
A verified account means:
Secure transactions
Linked bank account
Access to premium services
## Buy verified cash app account reddit
People on Reddit often discuss buying accounts due to:
Convenience
Faster setup
Avoiding verification delays
## Buying verified cash app account
Think of it like buying a ready-made business instead of starting from scratch.
## Benefits of a Verified Cash App Account
Higher transaction limits
Bitcoin access
Better trust
More features
## How to Buy a Verified Cash App Account
Steps:
Find trusted provider
Check reviews
Buy securely
Get login details
## Buy BTC Enabled Cash App Account
Crypto lovers prefer BTC-enabled accounts because:
Easy Bitcoin transactions
Secure transfers
Fast processing
## What is the Limit of a Verified Cash App?
Verified accounts allow:
Sending thousands per week
Receiving unlimited funds
Huge upgrade from unverified accounts.
Email: contact.smmproit@gmail.com
Telegram: @smmproit
Whatsapp:+1(812)528-8960
https://smmproit.com/product/buy-verified-cash-app-accounts/
If you're running a gaming business or dealing with fast-paced financial transactions, you already know one thing: time is money. That’s where a verified cash app account comes into play. Instead of dealing with limits and delays, verified cash app accounts give you smooth access, higher transaction limits, and uninterrupted services.
Let’s dive deep and explore everything step by step
## Why should you buy Verified Cash App accounts for your gaming business?
Running a game host platform or handling in-game payments? You need speed, trust, and flexibility.
### Gaming Payments Made Easy
With verified cash app accounts, your financial transactions become instant. No delays, no confusion. Players can send money quickly, and you can receive it without limits.
### Faster Transactions for Players
Gamers hate waiting. A verified account ensures smooth transactions so players stay engaged. Think of it like live streaming vs buffering — one keeps people hooked, the other loses them.
## The positive side of Buy Verified Cash App Accounts
### Security & Trust
A verified account builds trust. Since it’s linked with a government-issued id and phone number, users feel safe sending money.
### Higher Limits
Unlike unverified accounts, verified ones offer:
Higher transaction limits
Unlimited uploads share infinite
Better access to premium services
## How to unlock Cash App Borrow?
Want to access borrowing features? Here’s how:
### Step-by-Step Process
Use a verified cash app account
Maintain regular transactions
Link your bank account
Keep account activity active over time
Consistency is key here. The more you use it, the more features unlock.
## Benefits of Owning Buy Verified Cash App Accounts for gaming business
### Business Growth
More transactions = more money. Simple math.
You can:
Accept payments faster
Run multiple profiles
Manage creators upload easily
### Multiple Profiles Advantage
Running different games? Use multiple profiles to manage them efficiently. It’s like having multiple shops under one roof.
## How to Buy Verified Cash App Accounts from smmproit
Buying from smmproit is simple and smooth.
### Step-by-Step Buying Guide
Visit platform
Choose verified account
Complete payment
Get account upload instantly
Access via free login
You’ll also get 24 hours reply contact support.
## Why Do People Trust smmproit
### Customer Support
They provide quick help via telegram and support channels.
### Quality Services
Verified accounts only
Safe transactions
Reliable delivery
That’s why people keep coming back.
## When Buy Verified Cash App Accounts?
### Best Time to Purchase
When scaling your gaming business
When transaction limits block growth
When you need uninterrupted listening upfront tracklists (continuous service flow)
## Buy verified cash app accounts
This keyword is trending for a reason. Businesses want:
Fast payments
Reliable services
Unlimited uploads share infinite
## Buy a verified cash app account
Buying one saves time. Instead of going through long verification, you get instant access.
## Buy cash app verified account
A verified account means:
Secure transactions
Linked bank account
Access to premium services
## Buy verified cash app account reddit
People on Reddit often discuss buying accounts due to:
Convenience
Faster setup
Avoiding verification delays
## Buying verified cash app account
Think of it like buying a ready-made business instead of starting from scratch.
## Benefits of a Verified Cash App Account
Higher transaction limits
Bitcoin access
Better trust
More features
## How to Buy a Verified Cash App Account
Steps:
Find trusted provider
Check reviews
Buy securely
Get login details
## Buy BTC Enabled Cash App Account
Crypto lovers prefer BTC-enabled accounts because:
Easy Bitcoin transactions
Secure transfers
Fast processing
## What is the Limit of a Verified Cash App?
Verified accounts allow:
Sending thousands per week
Receiving unlimited funds
Huge upgrade from unverified accounts.
Buy Verified Cash App Account – Complete Guide
Email: contact.smmproit@gmail.com
Telegram: @smmproit
Whatsapp:+1(812)528-8960
https://smmproit.com/product/buy-verified-cash-app-accounts/
If you're running a gaming business or dealing with fast-paced financial transactions, you already know one thing: time is money. That’s where a verified cash app account comes into play. Instead of dealing with limits and delays, verified cash app accounts give you smooth access, higher transaction limits, and uninterrupted services.
Let’s dive deep and explore everything step by step 👇
## Why should you buy Verified Cash App accounts for your gaming business?
Running a game host platform or handling in-game payments? You need speed, trust, and flexibility.
### Gaming Payments Made Easy
With verified cash app accounts, your financial transactions become instant. No delays, no confusion. Players can send money quickly, and you can receive it without limits.
### Faster Transactions for Players
Gamers hate waiting. A verified account ensures smooth transactions so players stay engaged. Think of it like live streaming vs buffering — one keeps people hooked, the other loses them.
## The positive side of Buy Verified Cash App Accounts
### Security & Trust
A verified account builds trust. Since it’s linked with a government-issued id and phone number, users feel safe sending money.
### Higher Limits
Unlike unverified accounts, verified ones offer:
Higher transaction limits
Unlimited uploads share infinite
Better access to premium services
## How to unlock Cash App Borrow?
Want to access borrowing features? Here’s how:
### Step-by-Step Process
Use a verified cash app account
Maintain regular transactions
Link your bank account
Keep account activity active over time
Consistency is key here. The more you use it, the more features unlock.
## Benefits of Owning Buy Verified Cash App Accounts for gaming business
### Business Growth
More transactions = more money. Simple math.
You can:
Accept payments faster
Run multiple profiles
Manage creators upload easily
### Multiple Profiles Advantage
Running different games? Use multiple profiles to manage them efficiently. It’s like having multiple shops under one roof.
## How to Buy Verified Cash App Accounts from smmproit
Buying from smmproit is simple and smooth.
### Step-by-Step Buying Guide
Visit platform
Choose verified account
Complete payment
Get account upload instantly
Access via free login
You’ll also get 24 hours reply contact support.
## Why Do People Trust smmproit
### Customer Support
They provide quick help via telegram and support channels.
### Quality Services
Verified accounts only
Safe transactions
Reliable delivery
That’s why people keep coming back.
## When Buy Verified Cash App Accounts?
### Best Time to Purchase
When scaling your gaming business
When transaction limits block growth
When you need uninterrupted listening upfront tracklists (continuous service flow)
## Buy verified cash app accounts
This keyword is trending for a reason. Businesses want:
Fast payments
Reliable services
Unlimited uploads share infinite
## Buy a verified cash app account
Buying one saves time. Instead of going through long verification, you get instant access.
## Buy cash app verified account
A verified account means:
Secure transactions
Linked bank account
Access to premium services
## Buy verified cash app account reddit
People on Reddit often discuss buying accounts due to:
Convenience
Faster setup
Avoiding verification delays
## Buying verified cash app account
Think of it like buying a ready-made business instead of starting from scratch.
## Benefits of a Verified Cash App Account
Higher transaction limits
Bitcoin access
Better trust
More features
## How to Buy a Verified Cash App Account
Steps:
Find trusted provider
Check reviews
Buy securely
Get login details
## Buy BTC Enabled Cash App Account
Crypto lovers prefer BTC-enabled accounts because:
Easy Bitcoin transactions
Secure transfers
Fast processing
## What is the Limit of a Verified Cash App?
Verified accounts allow:
Sending thousands per week
Receiving unlimited funds
Huge upgrade from unverified accounts.
·41 Views
·0 voorbeeld